
Contents
- Introduction
- Levels of Mastery
- Manage Formative Assessments
- Marking Formative Assessments
- Reporting on Formative Assessments
- Formative Radar
- Mastery Overview
Introduction
The Formative Assessment Module on BehaviourWatch enables you to log, track and report on achievements for students and young people (YPs) on a more qualitative level.

Unlike Summative Assessment tracking which enables you to record grades and scores, with Formative Assessment tracking you can record unique and more personal achievements. These achievements can be based upon the National Curriculum, or can alternatively be adapted from your own bespoke internal methods of assessment and tracking. Examples of Formative Assessment methods may include using ‘I Can’ statements and marking these as Achieved or Not-Achieved. Once you have recorded Formative Assessment data over multiple months you will be able to demonstrate progress over time for a student/YP.
This guide will show you how to set up, mark and report on Formative Assessments in SchoolPod.
Levels of Mastery
Before setting up any Components or Assessments we will first need to set up the Levels of Mastery (grades) for the assessments.
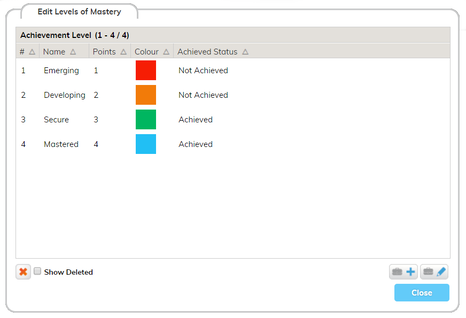
Head to Admin – Exams and Assessment – Formative Assessment – Levels of Mastery. When you are creating/editing the Levels of Mastery you will get the following options: Name, Order No, Colour, Points and Achieved Status.
Name – This is the name of the grade/level you will be giving to the student. It’s worth knowing that when marking the assessments on the front end of Formative Assessments only the first letter will show for the grade/level. Example: Emerging will show as an E.
Order No – This is the order of the grades/levels. Depending on the order chosen, this will determine when the grade/level shows when marking the assessment. If a grade has the order of 3, this will mean it will take 3 clicks to cycle through and get this grade to show.
Colour – This is the background colour for that grade/level. This will show both when you mark Statements, and when you report on the data in reports such as Mastery Overview.
Points – Adding points to grades/levels needs to be done so that you can report on the information you have entered. Our Formative Assessment reports look at the points for the grades when displaying the information. Please make sure not to add minus/negative point values, as this does not reflect in the reports. Make sure you are happy with your point setup before adding grades, as the grades may need to be re-saved if the point values are changed at a later date.
Achieved Status – Below where you enter the grades/levels in Home – Formative Assessments is a small reporting function. Here you can look at the number of statements that have been Achieved/Not Achieved. So, depending on what you set for the grade/level, this will determine what this reporting section looks at.
Manage Components
Once the Levels of Mastery are in place we can then move on to setting up the Components and Statements.
You will need to go to Admin – Exams and Assessment – Formative Assessment – Manage Components.
In this page you will get the chance to setup your Component, Sub Components and Statement.
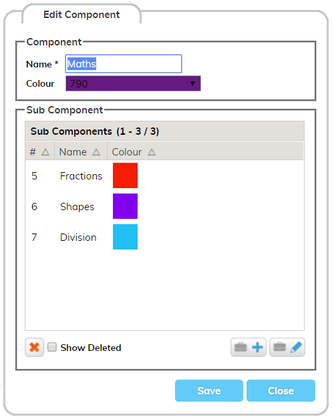
When creating/editing Components you will get the Add/Edit Component box like the image above.
First of all you will need to enter a Component name, this can be something like, English – Level 1, English Year 1 Writing etc. Once you have the name you can choose the colour of this Component (we will see what this looks like further down when we are marking the assessment).
Once you have the Component set up, we can move onto the Sub Components. If your Component was English – Level 1 the Sub Components could be Reading, Writing and Speaking and Listening. If your Component is Mathematics the Sub Components could be, Shapes, Division, Multiplications etc…
To add the Sub Components you will need to click on the Brief Case Button with a + next to it in the bottom right. Simply break the Component down into sub categories.
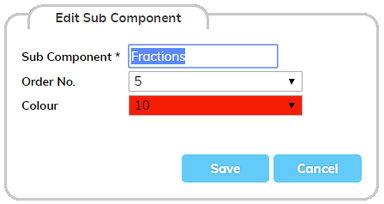
You will be given the options for a Name, Order No and Colour (this will also be shown further down when marking the assessment).
After your Components and Sub Components are set up we can move onto the Statements. To add the Statements you will need to highlight the Component you want to add the Statements to and then in the bottom right click on Manage Statements. Here you can add/edit Statements for the selected Components. When adding/editing a Statement you will get the options below.
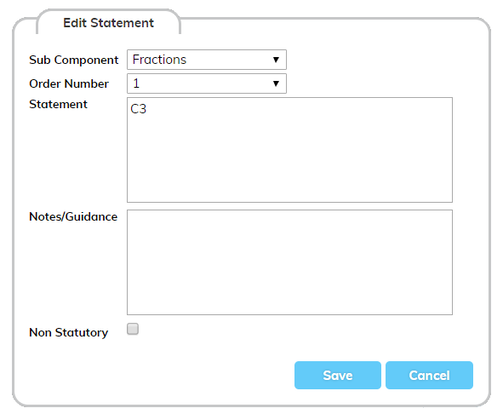
Sub Component – This is the Sub Component you want the Statement to relate to/come under.
Order Number – This will allow you to set/adjust the order that the Statements show in.
Statement – This is where you enter the text for the Statement.
Notes/Guidance – This allows you to add some notes or guidance for the Statement.
Non Statutory – This will make Statements within Home – Formative Assessments bold. Many schools tend to follow the national curriculum but if you wanted to add your own Statement you can mark them as Non Statutory and they will stand out compared to most of the other Statements.
Manage Formative Assessments
The final step after setting up the Levels Of Mastery, Components, Sub Components and Statements to bring these together as a completed assessment setup.
To add the Formative Assessments you will need to go to Admin – Exams and Assessment – Formative Assessment – Manage Formative Assessments. Within this page you can create/edit existing assessments. Here you also have the options for the following:
Formative Admin Group – The Formative Admin Group is the group of staff members that can delete/un-delete grade/level history for Statements within Home –Formative Assessments (Details regarding this will be further down).
Student Name Display – Here you can choose the way the students names are displayed. The options we have are as follows: First Name Last Name, Last Name First Name, Preferred First Name Preferred Last Name, Preferred Last Name Preferred First Name, First Name Last Initial and Preferred First Name Preferred Last Initial.
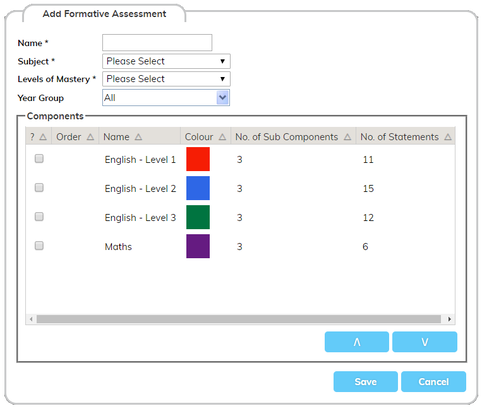
When creating/editing an assessment you will get a frame that looks the image in the top right.
Name – This is where you will enter the name of the assessment.
Subject – This is the subject relating to the assessment.
LevelsofMastery – This dropdown is a list of the Levels of Mastery that have been setup.
Year Group – This is where you select the year groups that the Formative Assessment/Components are targeted for.
Components – This is a list of Components that have been set up on the system. Any Components you want to use for the assessment you just need to tick. You can also adjust the ordering by highlighting the Component and then using the arrow up or arrow down options in the bottom right above Save and Cancel.
Marking Formative Assessments
Now that we have been through setting up assessments we can move on to marking them. There will be a Formative Assessment tab along the tab stream under Home. If you don’t have access to this, any admin member will be able to give you access by going to Admin – Manage Slip Access and selecting ‘Formative Assessment’ from the Element dropdown.
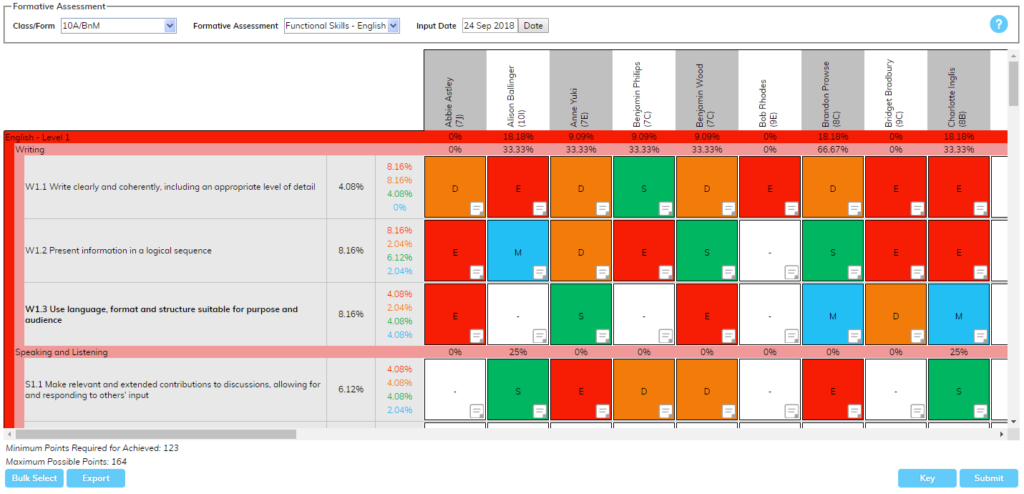
Below is an example of how your Formative Assessment page may look.
Class/Form – This will be a list of all current Classes (Admin – Classes) and Forms (Admin – Forms) in the system.
Formative Assessment – This is a list of all the assessments that have been set up in Admin – Exams and Assessment – Formative Assessment – Manage Formative Assessments
Input Date – This button will enable you to choose the day you are inputting the grades/levels for.
You will first need to select the Class/Form you want to view by using the dropdown, then you will need to select the assessment you want to mark the students for from the Formative Assessment dropdown. On the left-hand side going down you will get the Components in the order you set on the setup side. Across the top, left to right, you will get the student names.
To mark the Statements against the students you simply need to click on the squares relevant for the Statement and student. The ordering that the grades show in is defined when setting up the Levels of Mastery.
Example: If I was using E, D, S, M and I clicked twice I would get D as the grade/level. Once you have given the students their grades/levels you will need to click Submit in the bottom right corner for the grades to be saved.
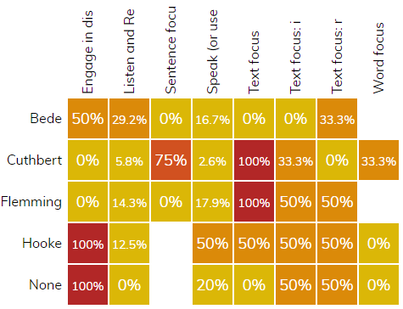
In the below image you will see that some of the Statements have been marked and there are some additional percentages showing. Looking at the percentages to the right of the Statements, the first is the percentage of students that have achieved the particular Statement in that row. Remember earlier when we set up the Levels of Mastery and said whether the grades/levels were Achieved or Not Achieved? This is where we start to see that information pull through. The second column to the right of the Statements will have percentages shown in different colours, these colours will relate to the grade/level. This column shows you the overall percentage for that Statement relating to the grades set for each student. The percentages that are in line with the students/grades/levels are looking at whether the Component and Sub Component have been Achieved.
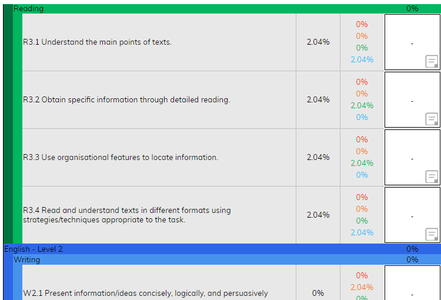
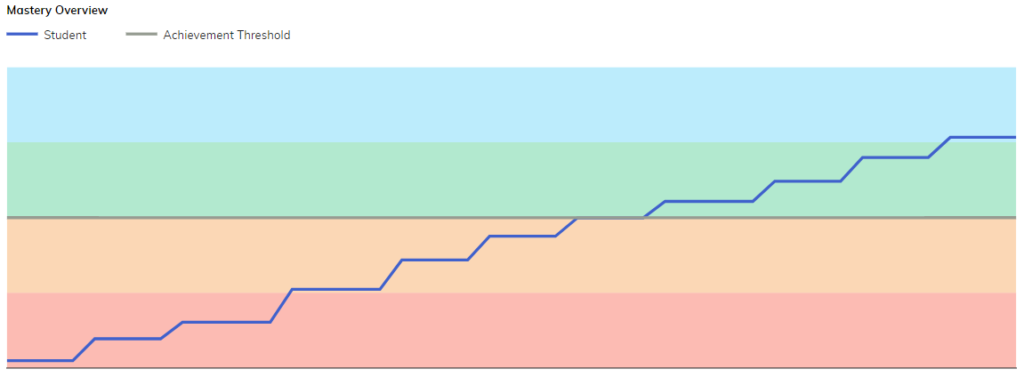
In the image on the right you will be able to see the settings for the Components and Sub Components you have set. As you can see where the deep green line is coming down, there is another faint green line to the right, this is the Sub Component for the Component.
Further down you will also see the line turns blue, this is because the first Component has finished, and the blue line is a new Component. The second colours are the ones that have been set for the Sub Components.
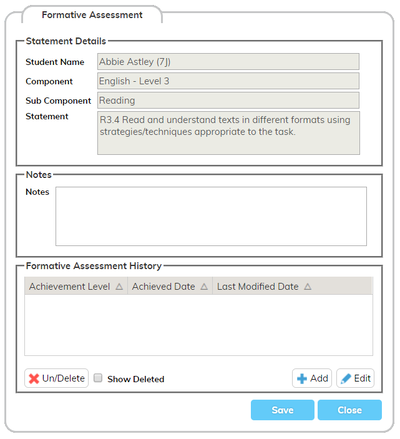
Within each grade/level square there will be a little paper/note icon in the bottom right corner. If you click on this, you will get the following frame.
The first section called Statement Details gives you details regarding the Statement that you have set up.
The middle section entitled Notes is where you are able to enter some general notes regarding the Statement.
The last section is the Formative Assessment History of that Statement, this will allow you to see the grades/levels the student was previous on. In this section you can also add/edit grades/levels for the assessment.
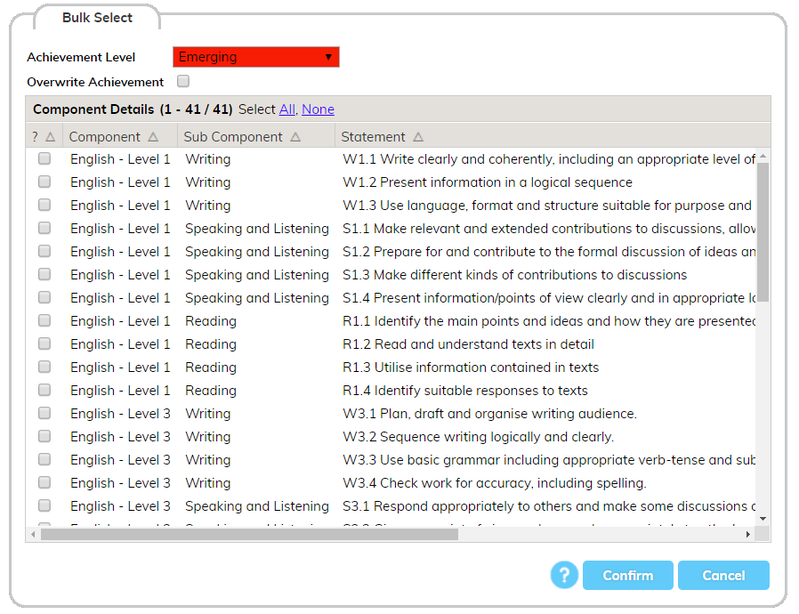
Bulk Select – This option is in the bottom left of the Formative Assessment page.
Clicking Bulk Select will allow you to bulk assign an Achievement Level to the selected Statements. Simply tick the Statement you want to bulk mark, select the Achievement Level and then click Confirm. This will mark all the students within the class/form.
Reporting on Formative Assessments
Once you’ve set up and graded some of your assessments you can move on to reporting.
Our formative assessment reports are found in Reports – Formative. If you don’t have access to this, any admin member will be able to change that for you. They will need to head to Admin – Manage Slip Access and in the Element section select Formative (under the Reports sub-heading).
Formative Radar
The Formative Radar report presents data from Formative Assessments in a grid format.
This can be broken down and filtered by Formative Assessment, Component, Sub-Component or Statement.
If you’re familiar with our Behaviour Radar or Attendance Radar, you should have no problems using the Formative Radar. This offers group analysis of the Formative Assessment data you’ve been recording, with various options including Gender, Pupil Premium, SEN Status and FSM. You select your parameters in the top section of the report using the dropdowns, then click Go to run the report as seen in the image below.
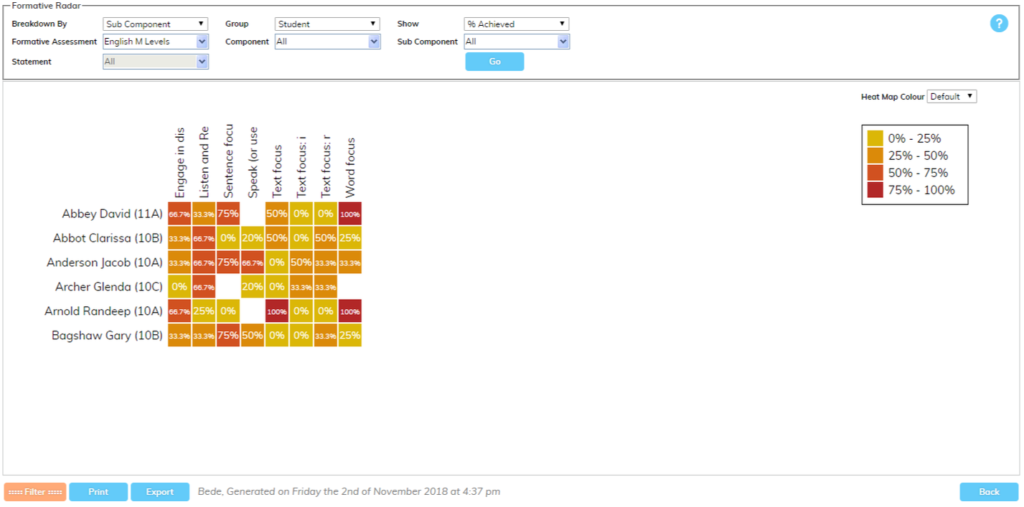
The Breakdown By dropdown in the top left will let you choose the assessment level to look at as mentioned previously. The breakdown will be listed across the top of the graphical part of the report.
The options under Group look at current student grouping memberships when the Report is generated. The only exceptions to this are Form on Assessment Date and Year Group on Assessment Date. These two options look at the group membership of the Student when the Assessment Result was recorded. The option you have selected will display down the left-hand side.

The Show dropdown is key to the data you are viewing, and this has various options as listed below:
Points Total
This displays the total number of points that have been awarded dependent on the filters selected.
Points Average
This takes the total points for each tile and divides this total by the number of students in the selection.
% Achieved
Each Level of Mastery (the marking options for each Formative Assessment statement) is categorised as either ‘Achieved’ or ‘Not Achieved’. This option returns the percentage of Statements marked with a Level of Mastery categorised as ‘Achieved’ for the Group in the Formative Assessment selected.
% Not Achieved
This Show option works in reverse of the % of Achieved option mentioned above.
Mastery Overview
The Mastery Overview report draws a graph based on the points accrued from a student’s Formative Assessment results.

To get data to show within the report the minimal amount of information you need to select is a student and an assessment. If you want, you can also select the components you want to look at. Once you have these selected, click Go and your graph will be displayed.

Student – This dropdown contains all on-roll students. Next to the student select is an ‘i‘ icon. If you click this when you have a student selected you will be given their Student Context information.Assessment – This contains all the Formative Assessments that have been setup in Admin – Exams and Assessment – Formative Assessment – Manage Formative Assessments.
Component – This contains all the relevant Components for the selected assessment. By default, all will be selected but you can choose to look at only certain Components if you choose to.
Date – This is the date range the report will look at for Formative Assessments data.
Provisions – If the student you have selected has any provisions you can select which one you would like to show within the report. This will allow you to see if the provisions have helped the student make progress. These are shown with opaque blue bars. Using this option shows the report by week.
ShowBy – You can view the Formative Assessment information either by Month, Term or Week.
Attendance – Selecting Linear or Best Fit will determine how the student’s attendance percentage will show on the report. The attendance information is shown with a Green Line.
CompareTo – This will take the average of the option selected and compare this to the student you have selected. If the student is included in the option you have selected their progress will not be included in the average. The options we have to compare to are: None (default option), Form (the selected students form group), FSM, Non-FSM, Pupil Premium, Non-Pupil Premium, SEN, Non-SEN, Year Group (the selected students year group) and finally a list of the categories you have set up on the system in Admin – Categories. The Compare To option is shown with a Red Line.
ProgressAverage – This takes the average progress for the assessment and plots a Purple Line in the report.
Forecast – If you turn this option on, the system will look at how the student is doing and predict for you where the student will finish at the end of the year. The system takes the average for the student and then uses this to predict their final score. You can also adjust the student average for the Forecast by adjusting the value in the text box. The Forecast is shown with a Black Line.
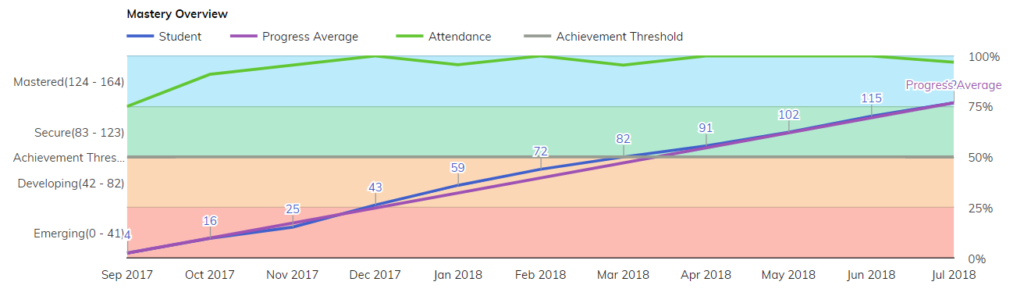
ShowAnnotations – This option will be on by default and will show you the number of points the student is on without having to hover over the plotted line. This will also show the values on the x-axis. Un-ticking this will remove these.
ShowBanding – This option will be on by default. Amending this will toggle on/off the background colours that are showing. These background colours separate out and distinguish the Levels of Mastery. You will also see next to the Levels of Mastery there are points brackets which are the point ranges for the levels. Example: if you had 10 Statements for an assessment and the points value for Emerging was 1, the range would be 0 – 10.
Key – This will show you what each colour on the report represents. Example: If you are showing Attendance this will be a Green Line, ProgressAverage is a Purple Line.


