Hints and Tips before you create your Parents’ Evening event
- Ensure your student and staff data is up to date in your Parents’ Evening account. Our Preparation Guide will assist you with this.
- If you have an event over multiple days, you can include them all in one event.
- When creating an event, comfort breaks can be used to tailor teacher availability. This means that you can have one event over multiple days, even if teachers are taking part at various times.
- If running a video event, you might want to leave teachers a small gap between every appointment.
- You can continue editing an event after saving it, up until you send invites to parents. However, once you have invited parents, further changes to your event could cause booking to be lost.
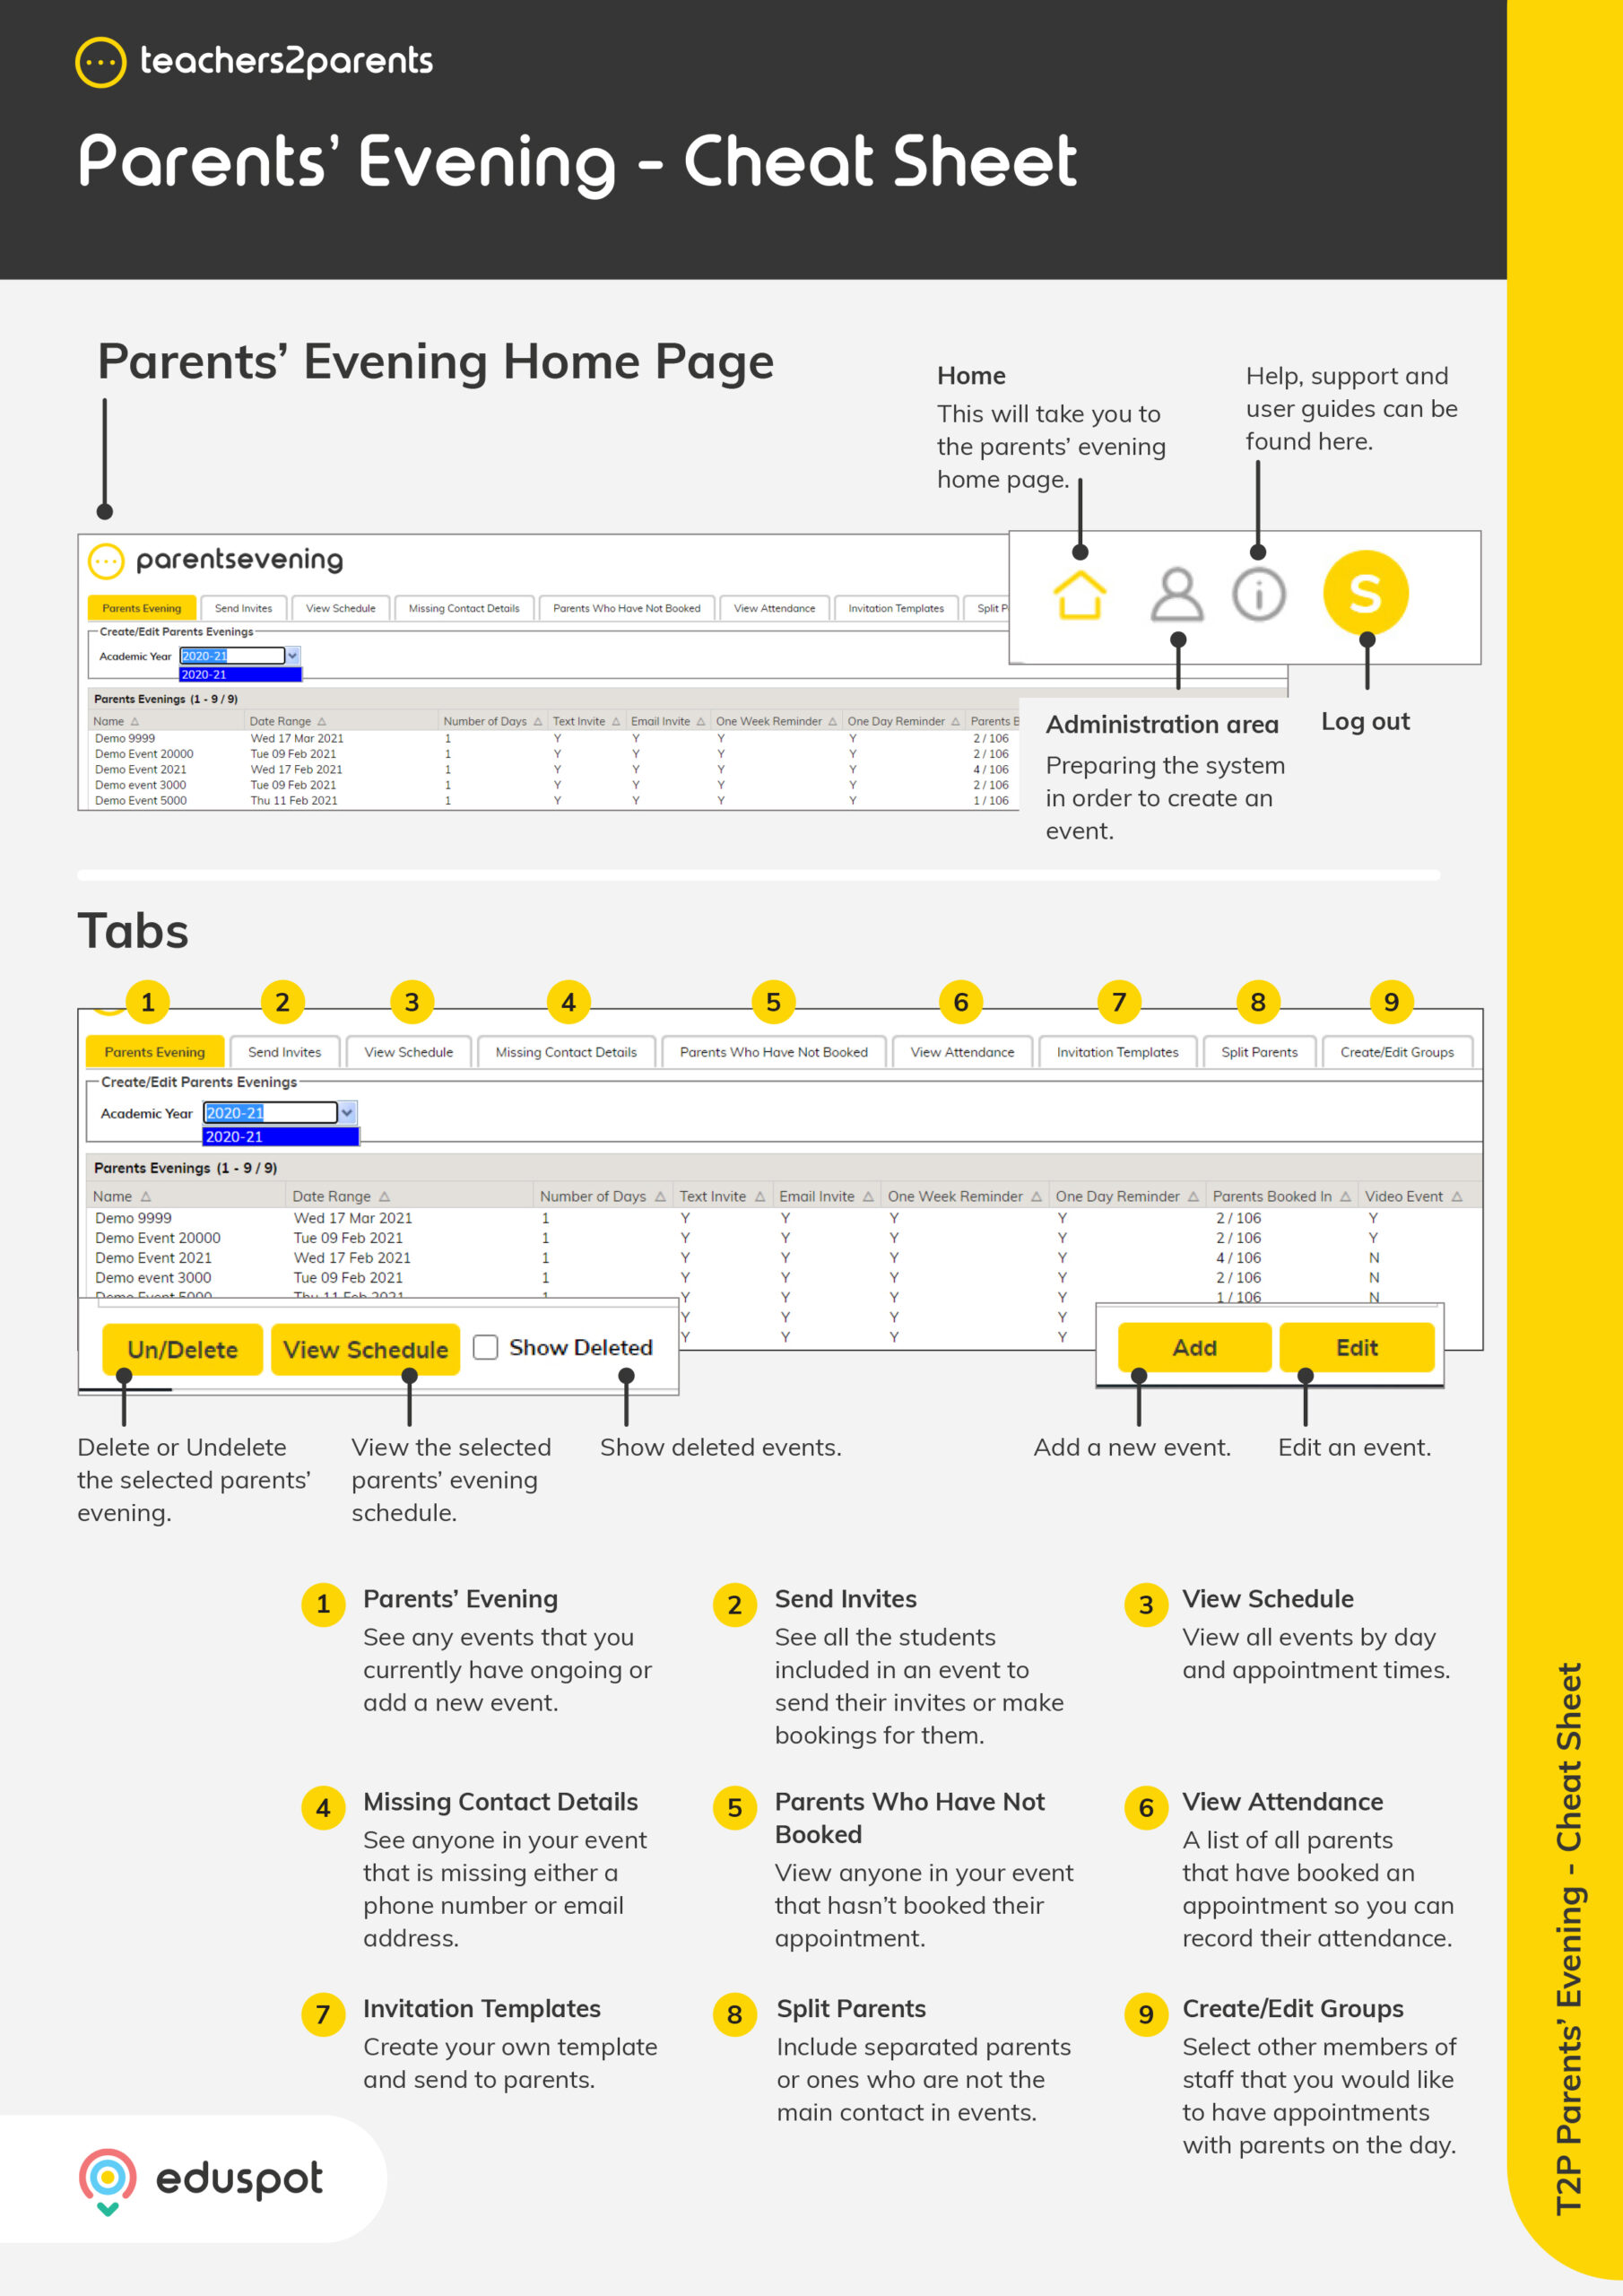
Creating the event
Event details
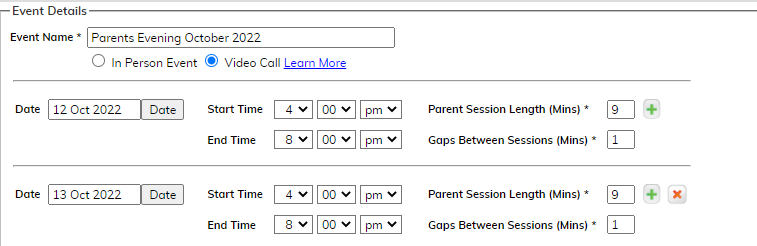
- Event name must be unique to each event. We advise using month and year in the name to ensure uniqueness – i.e. “Parents’ Evening October 2022.”
- If subscribed to PE Video, choose whether you are running an in-person or video call event.
- Set dates and start/end times (comfort breaks later to edit individual teacher availability).
- Start time is the earliest start time for any teacher in school.
- End time is when the last appointment of the day is set to finish for any teacher. For example, if you have 10-minute appointments and the last appointment is at 6.50pm, then set your end time for that day to 7pm.
- Set your parent session length (the time in minutes that a teacher speaks to each parent). And set your gaps between sessions.
- For an in-person event, you may wish for sessions to roll on back-to-back. For example, this would mean setting a 10-minute session length, with zero gaps between sessions.
- For video call events you may wish to include a small gap between appointments.
Please note: the parent session length combined with any gaps between sessions, will equal the interval of which parents can book. Therefore, if you want appointments every 10 minutes, but would like teachers to have a gap between each video call appointment, set your session length to 9 minutes, with a 1-minute gap between sessions.
- To add extra days to your event, click the green plus button next to Parent Session Length. This will copy the details from the first date to the next date in the calendar, and you can amend as required.
Invites and event links
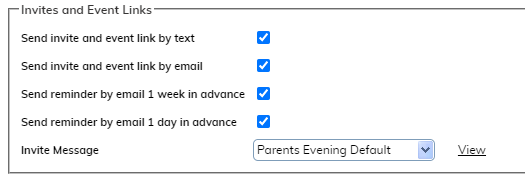
- Choose whether invites are sent by text, email, or both. We recommend leaving both ticked. (Note: you do not need to be subscribed to our Teachers2Parents Text/Email messaging system for this feature to work.)
- Choose whether to send email reminders a week or a day in advance, or both. Again, we recommend leaving both ticked. Reminders are sent to all parents that have booked an appointment.
- In the Invite Message dropdown, select the invite message template you wish to send to parents. Click the view link to preview the message template.
Please note: You can add or edit templates on the Invite Templates tab once you have saved your event. Changing tabs now will lose your progress.
Video link

If you have selected to run a video call event, you can select how long before the start of the event the video link is sent to parents and teachers. We recommend leaving this at the default time of 24 hours, as this is a good balance between it being early enough to be received in time and not too far in advance, that it might be lost.
Invite Parents
This is where you select which forms or custom groups will be included in the parents’ evening. Select all the ones you want including, regardless of what days or times they are taking part in the event.
Please note: Forms will need to have a staff member assigned to them (in Admin > Staff). Find out more about this in our Preparation Guide.
Staff Locations
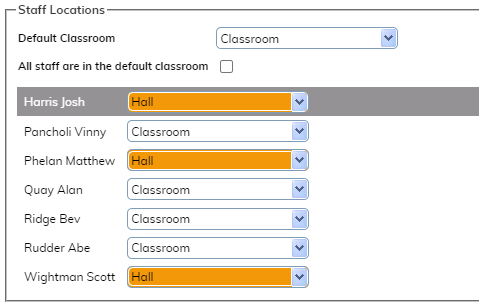
For an in-person event, you can choose what meeting location will show on the parent’s email reminders. Leave ‘All staff are in the default classroom’ ticked to have all staff show in the same location, such as the ‘Main Hall’ or ‘Classroom,’ or untick it to choose separate locations for each.
Please note: if you would like more locations added to your system, please contact the support team.
Additional comfort breaks/Protecting blocks
Breaks are used to block appointment slots to remove the parents’ ability to book them. Commonly, used to add a break for all staff in the middle of an event. Or these could be used to block the beginning or end of an event for a specific staff member, so they can start or finish at a different time.
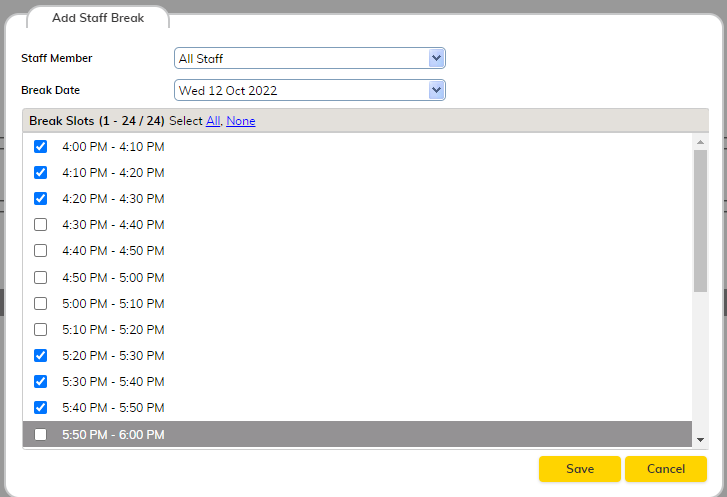
- Tick Add more break to open the Add Staff Break window.
- In the Staff Member dropdown, tick which staff you want to want to block slots for. Breaks can be applied for individual staff, multiple staff, or you can select the ‘All Staff’ option.
- In the Break Date dropdown, select the date you want the breaks to apply to (each day will need to be saved separately).
- Tick the break slots you wish to block parents from booking. ‘Select All’ can be used to block all the slots for that date, for the selected staff.
- Click Save.
- Repeat the above steps to add in more breaks, as required.
If you have an event that has teachers available at various times, you may find it easier to add breaks, one teacher at a time. For example, set breaks for teacher A on day one and save, add in more breaks for teacher A on day two and save, then move on to teacher B and so on.
Miscellaneous
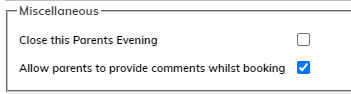
- Close the Parents’ Evening – Tick this and ‘Save’, to prevent parents from booking or changing appointments. You can still book or change appointments for parents after you have closed the event. This can be used to temporarily prevent further booking or changes.
- Allow parents to make comments whilst booking – this allows parents to leave a note for the teacher when they book an appointment. This note will be included in the teacher’s schedule. Untick before saving your event to disable this option.
When you have completed each section of adding your new event, you may get a warning from the system when attempting to save. Carefully read the warning and correct any mistakes you may have made in your setup. Once the event has been saved successfully, you can continue to the Send Invites tab.
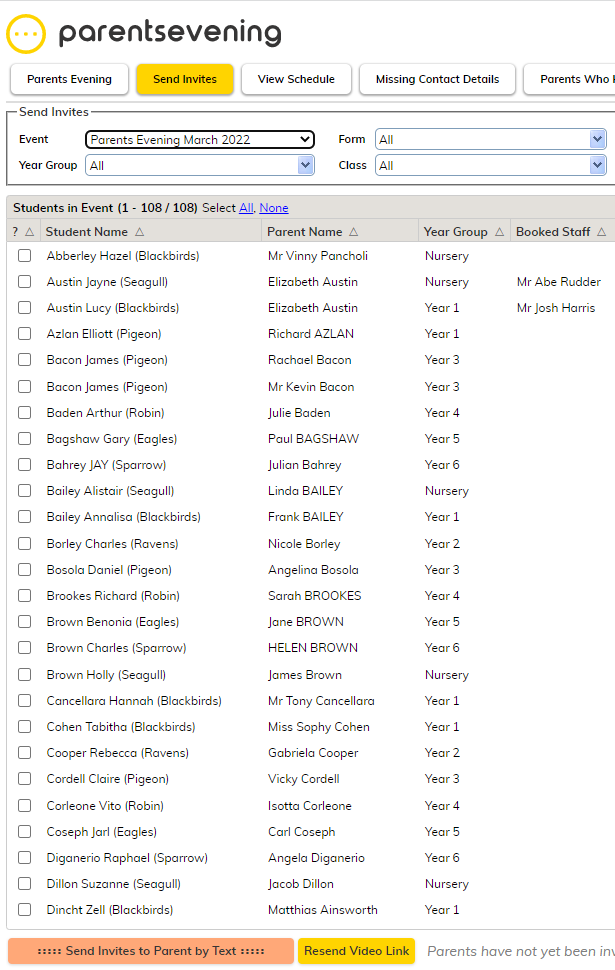
Sending invites and manually booking parents
On the Send Invites tab, you will see a list of the children that are taking part in the event. From here you can send invites to the parents to book their appointments. The event will go live to parents from the time you send your first invite to them.
- Tick the children whose parents you want to invite (Select all can be used to easily invite everyone).
- Click the Send Invites to Parent button in the bottom left of the screen.
If you are holding a video-call event, you are also able to resend video links to a parent from here.
- Tick the child/parent you wish to resend the link to.
- Then click the resend video link button in the bottom left of the screen.
Please note that this will only work after the video links have been sent out for the first time, automatically.
It is also possible to manually book an appointment on a parent’s behalf from this tab, as follows:
- Click on a child/parent name to select them from the list and click the Manually Book button.
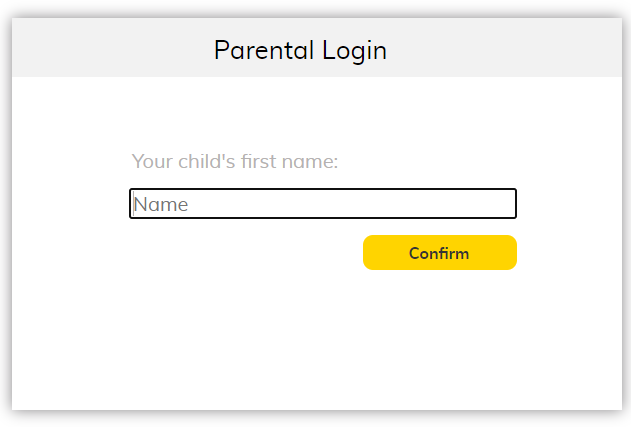
- Type the child’s first name, exactly as it is recorded in the system, when prompted. Then click Confirm.
Tip: After confirming, you will see the booking process as it appears to the parent at home.
- You will now see the child/children with their class teacher(s). Click Please Choose to display a list of available times for the teacher.


- Select the time that you wish to book. If enabled in the event setup, you will have the option to add a note in for the teacher. Type any notes, as required, then click Book.
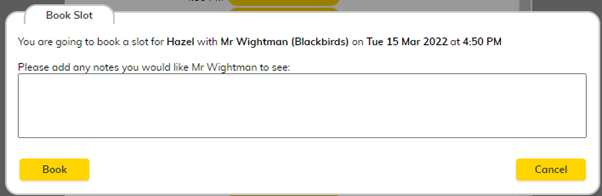
Once booked, it will return you to the preview, confirming the booking with the teacher, indicated by the green Booked button with the reserved time displayed. A confirmation email will be sent to the parent with the time chosen.
Click the green Booked button to make further changes to the booking, then:
- Click the green Booked time slot and confirm to remove the booking.
- Reserve a new time slot as per the steps above.
Tip: The Manually Booking feature can be used to check that breaks have been allocated to teachers correctly before you invite parents and open it for booking. Select a child from each class and view the times available for each teacher.
Close this Parents’ Evening
This prevents parents from making bookings, but still allows you to book a parent in from your side of the system. Just tick the box for ‘Close this Parents’ Evening’ and then click ‘Save’ in the bottom right corner. This can be used the day before an event so you can finalise your schedule.
Viewing schedules and sending them to teachers
The View Schedule tab is used to see your current bookings. These can be viewed one day at a time, which can be selected Event dropdown. Filters can then be applied for a particular teacher or class on that date.
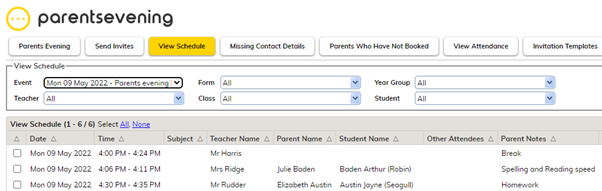
To provide a teacher with their schedule, select their name from the teacher dropdown then at the bottom of the screen, choose to:
- Print schedule – will allow you to print a copy of the schedule to then hand to the teacher.
- Email schedule – will send an email to the teacher with the schedule in.
Tip: If you leave the filters set to ‘All’, you can click Email Schedule to send an email to all the teachers with their own times, for the selected date. If your event is over multiple repeat this process, changing the selected day in the Event dropdown.
If you are running a video-call event, video links can be resent to a teacher from the View Schedule tab by choosing the teacher from the Teacher dropdown then click the Resend Video Link button (this can only be done after the video link has been sent for the first time, automatically).
Additional attendees can be added to a video-call booking from here. Simply tick the box to the left of the booking, and then click the Add Attendee button. Then submit the name and email address of the attendee you wish to add.