Parents’ Evening updates separately from Teachers2Parents Text and Email and SchoolMoney. Because it is a seasonal product, you would not usually update your student/parent data regularly, therefore it is likely that you will find your contacts date back to your previous event. We recommend that you import your current data before creating a new event.
Follow the steps in the sub-section that relate to your MIS, or if not listed, refer to the Other MIS/Creating your own CSV sub-section.
Importing from SIMS with the BW Sims Link
Updating via BW SIMS Link – Blue icon
If you log directly into SIMS, located on your own school server, and it is not hosted by Capita or your Local Authority, you will likely have the BW SIMS Link installed on one of your computers and the icon above on your desktop. To update Parents’ Evening with this, please do the following:
1. Double click the BW SIMS Link icon on your desktop
2. Check that the SIMS credentials and BW credentials and PIN are filled in (if not, contact the support team if you require details of what to fill in).
3. The BW SIMS Link will automatically count down from 20, and then start to import your data. This can be a slow process, so please be patient.
4. Once finished, it will countdown from 20 and close automatically.
5. Go to Admin > Students to see your current student data in Parents’ Evening.
Importing from SIMS with a CSV report
If you do not have BW SIMS Link installed or are a Centrally Hosted SIMS school (e.g. hosted by Capita) please follow the instructions below:
1. In SIMS, go to Reports > Run Report.
2. Expand the Focus folder.
3. Select Student.
4. Double-click on the Student_Data_Export_V15 report.
5. In the Parental Responsibility window, click OK.
6. In the Export As window, click Browse.
7. Type in the school’s full name in the filename and then .csv at the end.
8. Choose a location to save the file on your computer and click Save. If you use Hosted SIMS, we recommend saving it in the ‘C on…’ drive which is your local C: Drive.
9. In the Export As window, click OK.
10. The last window will say that the file has been created. Click OK.
11. In Parents’ Evening, go to Admin > CSV Import.
12. Under Import CSV Files, click Student Import.
13. Under Import Student Data, click Browse or Choose File.
14. In the File Upload window, select the .csv file and click Open.
15. The columns from the spreadsheet will appear on the page. Use the scrollbar to check that all the headings have the correct option selected in the drop-down menu.
• Note: If any of the headings say Do Not Import This Column then the data in that column will not be imported. You need to select the corresponding heading from the drop-down to make sure it imports e.g., if the PG1: Mobile says Do Not Import This Column then you need to select Parent Mobile Number from the drop-down.
16. Once you have confirmed that all the data will import, click Validate.
17. You will usually receive a message stating that there are validation messages which appear under Validation Results. Click OK.
18. If there are no red validation messages, then continue to the next step. If there are, check whether they indicate something is wrong with the data before continuing.
• Note: A red validation message will likely mean that the import will require an authorisation code, please see the Authorisation Code section.
19. Click Import.
20. If there are students who have left the school between now and your previous import, there will be a confirmation window stating that they will be off rolled. Click Yes.
21. You will see the Eduspot logo pulsing on screen to indicate it is importing. Once the logo disappears, refresh the page to return to Home.
22. Go to Admin > Students to see your current student data in Parents’ Evening.
Importing from RM Integris with a CSV report
Creating the Report
(If you have previously imported from RM Integris into Parents’ Evening, skip to the steps under Running a Report).
1. In RM Integris, go to Reports > Ad hoc Reporting – Simple.
2. Click Ad hoc Reports Manager.
3. Click Create report (plus icon) on the right.
4. In Report Name and Description, type T2P Parents Evening.
5. Tick Share Report with all users.
6. For Report Style, click Export.
7. Click Next.
8. Expand the Personal folder and add the following fields:
• First Name / Legal Surname / Date of Birth / Year / Class / Reference / Gender
9. Expand the Enrolment Details folder and add the following field:
• Entry Date
10. Expand the Parent Guardian 1 folder and add the following fields:
• PG1: Title / PG1: First Name / PG1: Surname / PG1: Emergency Ranking / PG1:
Mobile / PG1: Email / PG1: Parental Responsibility
11. Expand the Parent Guardian 2 folder and add the following fields:
• PG2: Title / PG2: First Name / PG2: Surname / PG2: Emergency Ranking / PG2:
Mobile / PG2: Email / PG2: Parental Responsibility
12. Click Next.
13. Under Data Selection Options, untick Class, House, and Student Find.
14. Click Next and Finish – The report has now been created.
Running the Report
1. In RM Integris, go to Reports > Ad hoc Reporting – Simple.
2. Click My Ad hoc Reports.
3. Select the report T2P Parents Evening – if you did not create the report yourself, it will be in Shared Reports.
o Note: If you did not create the parents’ evening report yourself and it was instead created by a colleague, you will find it in Reports > Ad hoc Reporting – Simple > Shared Reports.
4. This will show a list of year groups. Click on the hand icon to select them all.
5. Click Generate Report.
6. The T2P Parents Evening.csv will save to your Downloads folder. Open the file in Microsoft Excel.
7. Copy the contents of the spreadsheet from First Name to Entry Date (not including the headings themselves).
8. Scroll down to the bottom of the list and paste from the first empty cell without leaving an empty row.
9. Copy the contents of the spreadsheet from PG2: Title to PG2: Parental Responsibility (not including the headings themselves).
10. Scroll down to the first empty cell under PG1: Title and paste.
11. Delete the headings that include PG2 to remove those empty columns.
12. You will now have a spreadsheet where the top half has your students with their Parent Guardian 1 data and the bottom half has your students their Parent Guardian 2 data.
13. Save the .csv file and rename it with the school’s full name.
14. Follow the steps in Importing your CSV file into Parents’ Evening.
Importing from ScholarPack
1. In ScholarPack, go to Admin > Config > Data Exports.
2. Scroll down the drop-down menu to the section for Teachers2Parents.
3. Select the SP_T2P_ParentsEvening_Students option.
4. Click Generate Report to download the CSV file.
5. Once downloaded, open the CSV file in Microsoft Excel.
6. In the Parental Responsibility column, you will need to change every cell with the number 1 to Y for Yes. If you do not, none of your parents will import into Parents’ Evening.
a. To do this in bulk, highlight the Parental Responsibility column.
b. Hold the CTRL key and press F to open the Find and Replace window.
c. Click on the Replace tab.
d. In Find what, type 1.
e. In Replace with, type Y.
f. Click Replace All.
g. This will automatically every instance of 1 in that column with Y. Click OK in the confirmation window and close the Find and Replace window.
7. Click Save and rename the file to include the school’s full name.
8. Follow the steps in Importing your CSV file into Parents’ Evening.
Importing from Pupil Asset
1. Go to Admin.
2. Click Export in the toolbar.
3. Click CSV format in the menu on the left.
4. Click on Choose columns.
5. In Pupil Columns, tick the following fields:
o UPN / Legal Forename / Legal Surname / Date of Birth
6. In School Columns, tick the following fields:
o Year Group / Class / Start Date
7. In Export, tick the following fields:
o Parent Title / Parent Forename / Parent Surname / Parent Mobile / Parent Email
8. Click Choose these columns at the bottom in red.
9. Click Generate CSV.
10. Click Export as CSV to download the file.
11. Once downloaded, open the .csv file in Microsoft Excel.
12. Add a new column called Parental Responsibility and enter Y into each cell for Yes.
13. Save the file and rename it with the school’s full name.
14. Follow the steps in Importing your CSV file into Parents’ Evening.
Importing from Other MIS systems / creating your own CSV
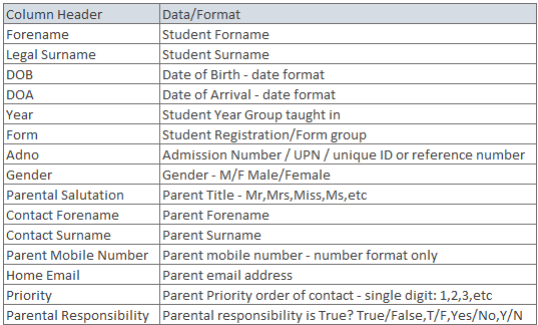
If you have previously imported your student/parent data from your MIS into Parents’ Evening, you should already have a report containing the data in the table below, which you can use again to update the system. If not, create a CSV with the following columns of data formatted as follows. Then follow the steps in Importing your CSV file into Parents’ Evening.
Importing your CSV file into Parents Evening
Once you have run your report from your MIS and have your data saved in a CSV, follow these steps to import it into Parents’ Evening.
1. In Parents’ Evening, go to Admin > CSV Import.
2. Under Import CSV Files, click Student Import.
3. Under Import Student Data, click Browse or Choose File.
4. In the File Upload window, select the .csv file and click Open.
o If you get a warning about the school name, then just copy the school name that appears in the pop-up and rename the file before selecting it again.
5. The columns from the spreadsheet will appear on the page. Use the scrollbar to check that all the headings have the correct option selected in the drop-down menu.
o Note: If any of the headings say Do Not Import This Column then the data in that column will not be imported. You need to select the corresponding heading from the drop-down to make sure it imports e.g., if the PG1: Mobile says Do Not Import This Column then you need to select Parent Mobile Number from the drop-down.
6. Once you have confirmed that all the data will import, click Validate.
7. You will usually receive a message stating that there are validation messages which appear under Validation Results. Click OK.
8. If there are no red validation messages, then continue to the next step. If there are, check whether they indicate something is wrong with the data before continuing.
o Note: A red validation message will likely mean that the import will require an authorisation code. See the Authorisation Code section below for details.
9. Click Import.
10. If there are students who have left the school between now and your previous import, there will be a confirmation window stating that they will be off rolled. Click Yes.
11. You will see the Eduspot logo pulsing on the screen to indicate it is importing. Once the logo disappears, refresh the page to return to Home.
12. Go to Admin > Students to see your current student data in Parents’ Evening.
Authorisation Code
If you get a red validation alert when importing a CSV file into Parents’ Evening, you may be asked to provide an Authorisation Code. This is a security measure to avoid scenarios where incorrect data is imported, potentially requiring all the data from the account to be deleted or causing an issue with creating your event.
1. Contact the support team (0207 237 8456 / www.eduspot.co.uk/support) who will provide you with the Authorisation Code.
2. Type the Authorisation Code into the required field.
3. Click OK.
4. Your CSV file will start importing your student and parent data.