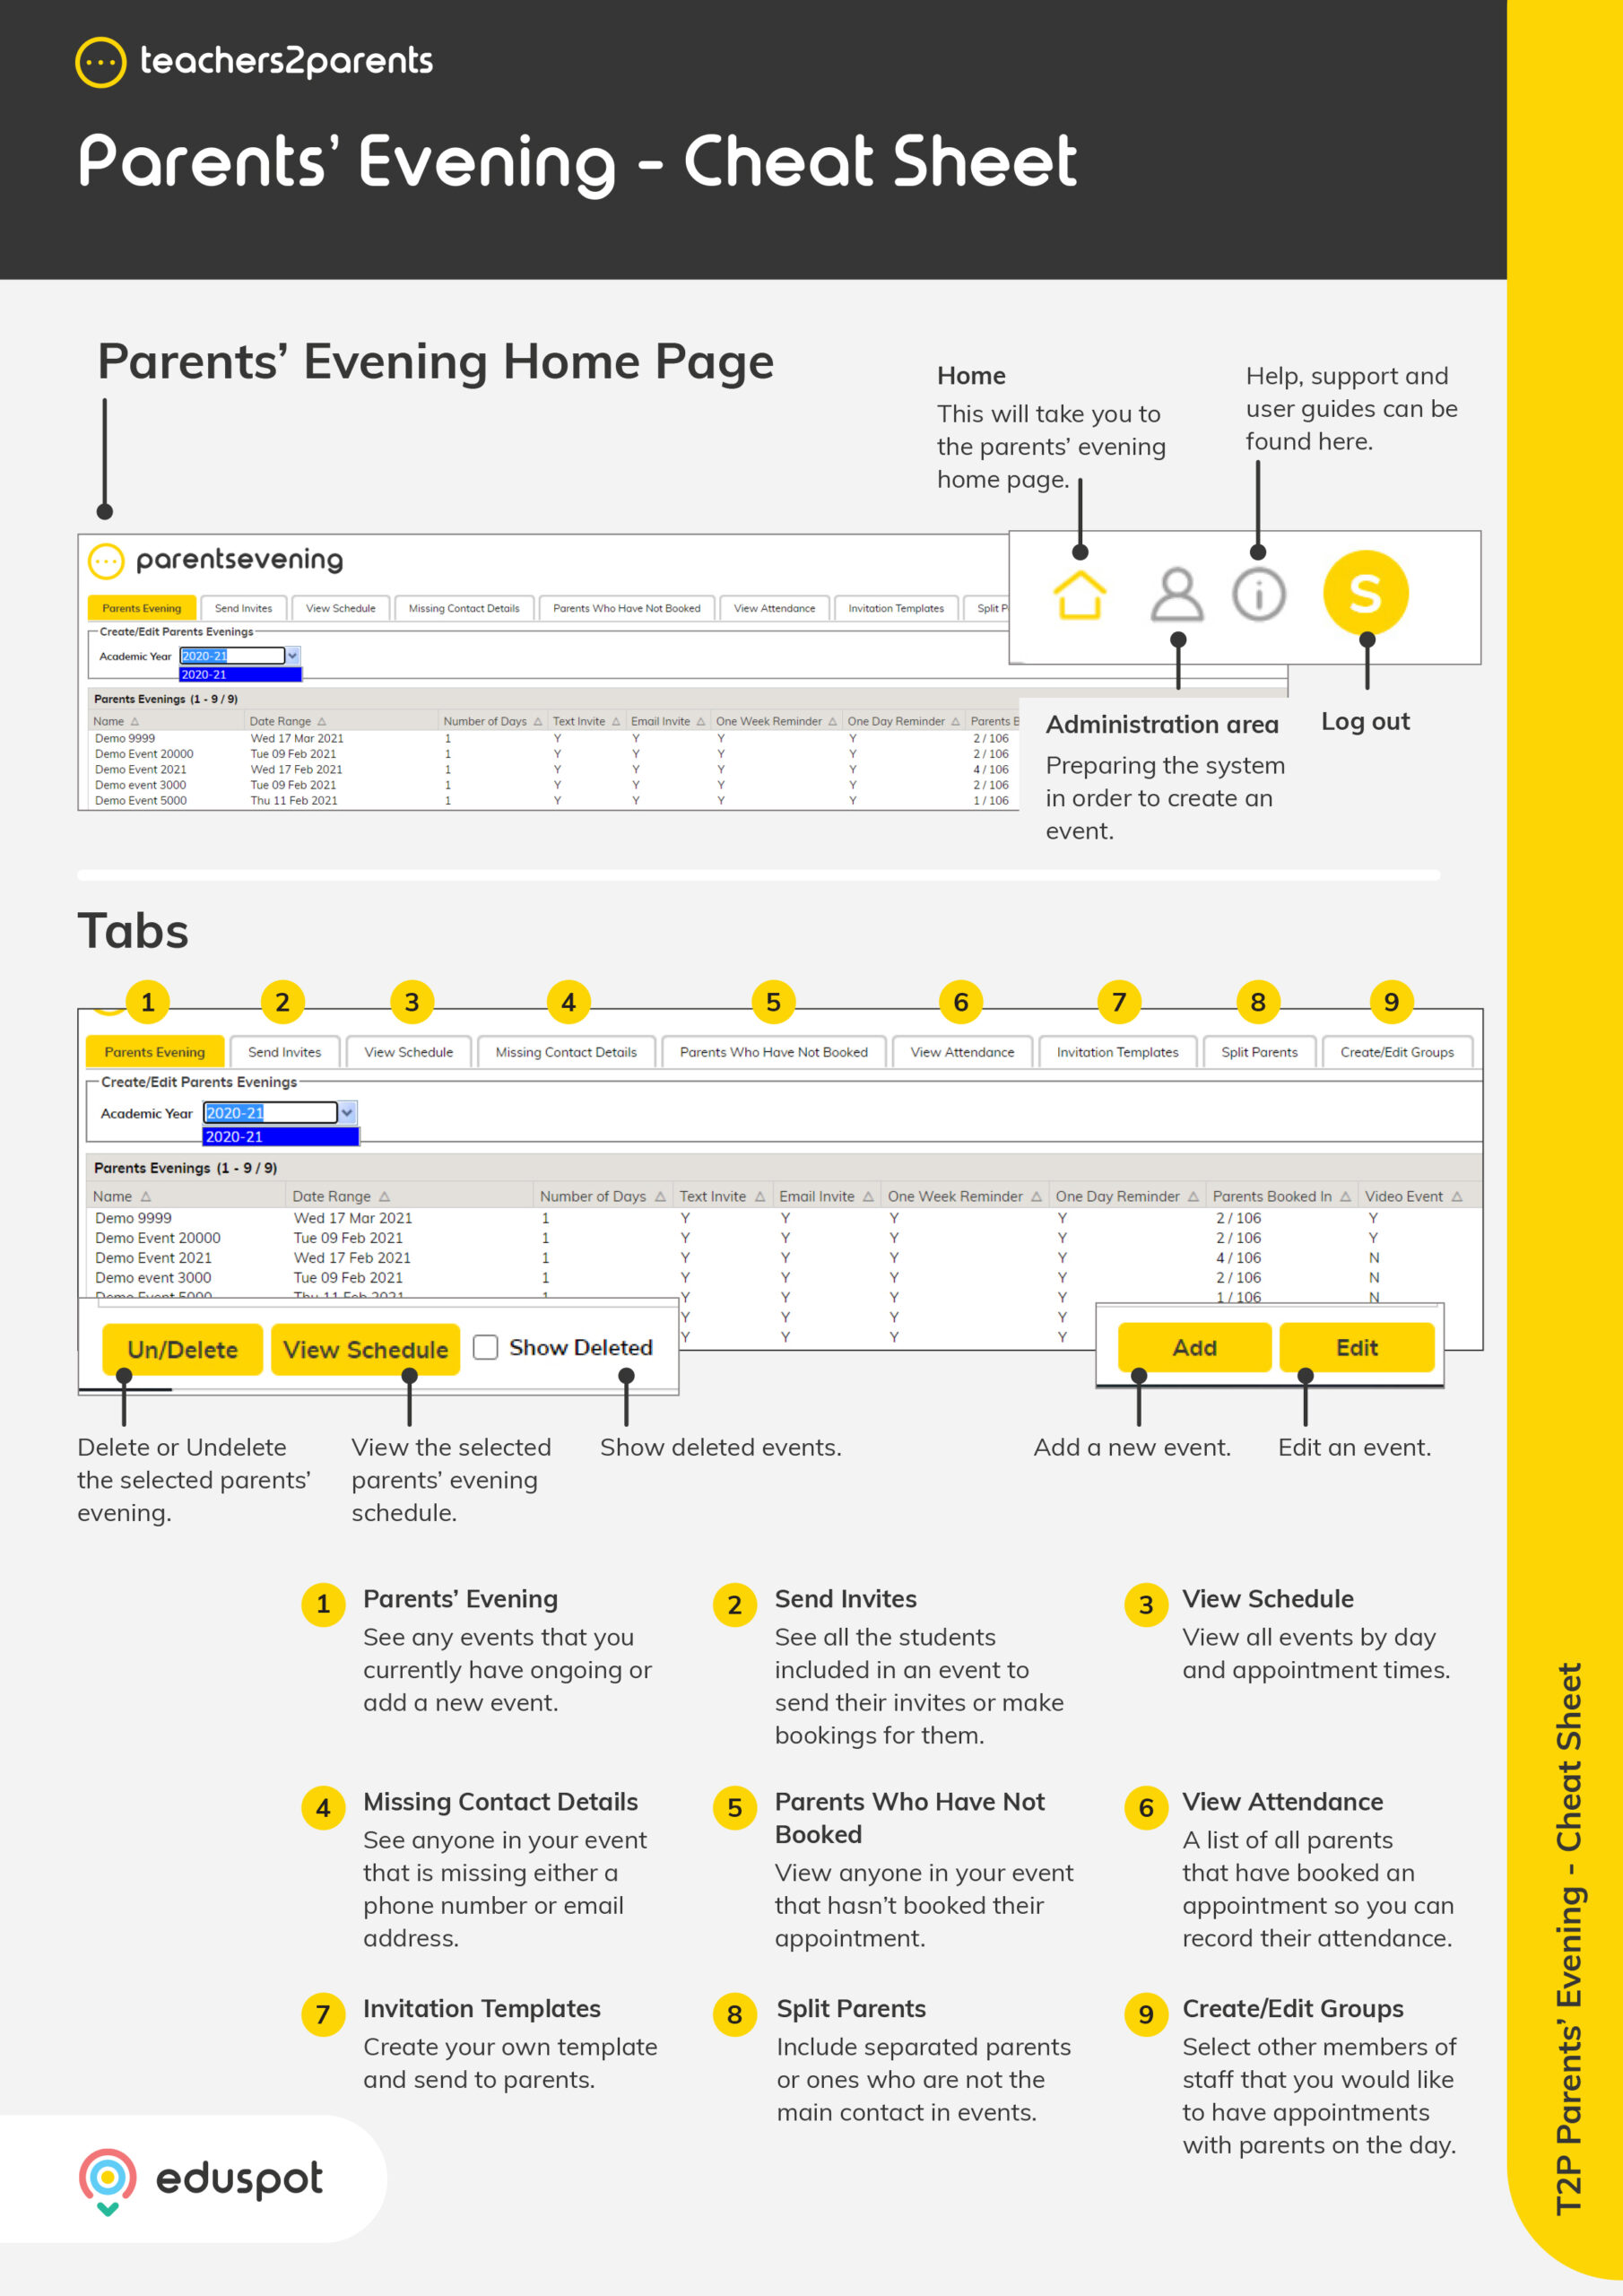
You can find ‘Admin’ in the top right-hand corner of the screen.

Here you will see the tabs Students, Staff, SIMS Link, CSV Import and Outbox.
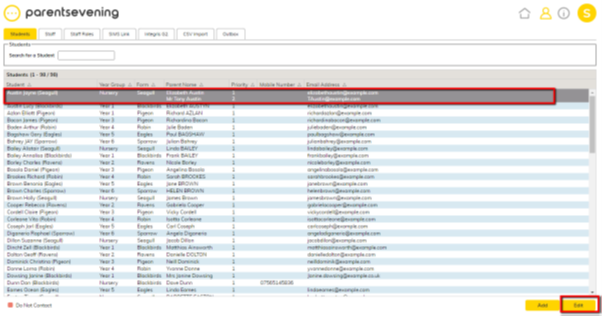
Students
This tab allows you to View, Add and Edit your students’ details. The home screen will show the students’ names, year groups, and forms, and show each parent’s name(s), priority, and contact details.
Please note: any manual changes you make in this section may be overwritten next time your school data is imported, whether that be a manual or automatic import from your management information system. If you are able to, we recommend making the changes in your MIS instead.

Search – You can search for any current student easily by using the search bar at the top of the screen.
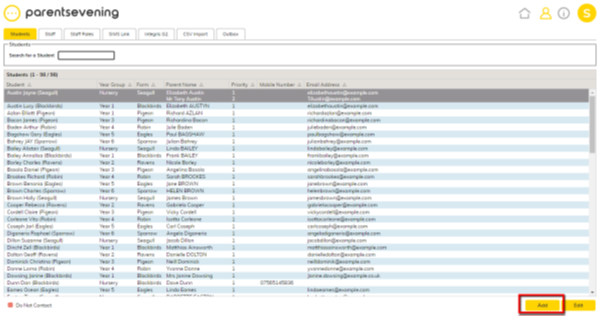
Add – To add a new student to the system, click ‘Add’ in the bottom right to open a new student details page.
In this window, you can add the required student’s details into the ‘Personal Details’ section. Once all details are added click ‘Save’.
All fields except for ‘Gender’ are compulsory to successfully save the new student.
‘ADNO’ refers to the student’s admission number – a unique number for each child. The admission number, reference number etc. If no other number is in your management information system or if you do not use a management information system, you can create these numbers yourself ensuring each is unique.

To go back to the main student list without saving any changes click ‘Back’ in the bottom right corner of the screen.
You can add a new parent to this student by clicking ‘Add’ in the bottom right corner of the ‘Parent Details’ section of the screen.
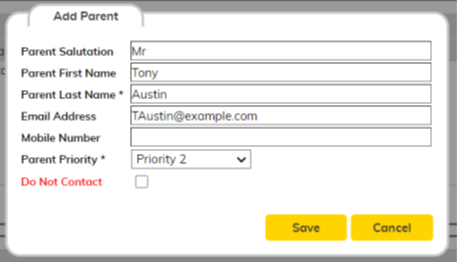
This will open a pop-up box in which you can enter the parent’s details. Please ensure you select a ‘Parent Priority’ as this will determine where the parent appears in the system. Priority 1 will receive an invite as standard; Priority 2 onwards will appear in the Split Parent list and can be sent an additional invite on a case-by-case basis.
Click ‘Save’ or ‘Cancel’ to return to the student screen without saving the changes.
If the new student has a sibling in the school and you wish for the two to be linked, you can do so by clicking ‘Add’ in the bottom right corner of the ‘Sibling Relationship’ section of the screen.

This will open a pop-up box in which you can select the sibling’s details. Click ‘Save’ to save the sibling relationship to the student or ‘Cancel’ to return to the student screen without saving the changes.
Linking students like this will enable them to both show up on a parent’s booking screen provided the parent is the same for both children.
Edit – To edit a student currently in the system, double click on the child or click on that child to highlight them in grey and click ‘Edit’ in the bottom right to open the student’s details page.
In this window you can edit the Students’ details as required. Student data can be changed in the ‘Personal Details’ section, however you won’t be able to edit the ADNO for a student.
A parent’s details can be edited by selecting that parent in ‘Parent Details’ and clicking ‘Edit’ in the bottom right of that section. A sibling link can be edited by selecting that sibling in ‘Sibling Relationships’ and clicking ‘Edit’ in the bottom right of that section.

Once all details are correct click ‘Back’ in the bottom right of the screen to return to the main student list.
Delete – Students cannot be deleted, but their personal details, parent details and sibling relationships can be.
To delete a parent from a student, select them from the ‘Parent Details’ section and click ‘Delete’ in the bottom left of that section. You will be asked to confirm. Click ‘OK’ to confirm or ‘Cancel’.
To delete a sibling link from a student, select the sibling you wish to remove from the ‘Sibling Relationship’ section and click ‘Delete’ in the bottom left corner of that section.
Staff
This tab allows you to View, Add and Edit your staff members’ details. The home screen will show the staff member’s name, email, and any forms they are linked to. These forms can be changed in a later section.
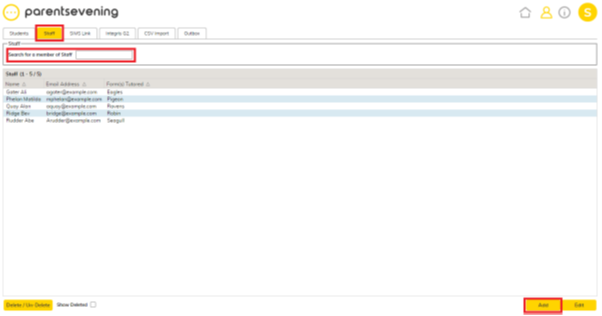
Search – You can search for any undeleted staff members easily by using the search bar at the top of the screen.
Add – To add a new staff member to the system, click ‘Add’ in the bottom right corner of the staff screen.
This will open a pop-up box in which you can enter the staff member’s details. To add a staff member into the system an email address will be required. You can also allocate the staff member to their Form via the Form Tutored dropdown. Click ‘Save’ to save the staff member or ‘Cancel’ to return to the staff screen.
Please note: If you assign two teachers to one form your parents will be able to book in with both teachers separately at the same times. As such it is recommended to set one teacher per form.

Edit – To edit a staff member currently in the system, double click on that staff member or click on that staff member to highlight them in grey and click ‘Edit’ in the bottom right corner.
This will open a pop-up box in which you can edit the staff member’s details. Click ‘Save’ to save your edits or ‘Cancel’ to return to the staff screen without saving the changes.
Delete/Un-Delete – If you need to remove a staff member from the system you can click the staff member you want removed and then click the ‘Delete/Un-Delete’ button in the bottom left.
All deleted staff members can be brought back into the system by ticking the ‘Show Deleted’ box in the bottom left. This will show you any deleted staff members highlighted in orange. Click the desired staff member and then click the ‘Delete/Un-Delete’ button in the bottom left.

SIMS Link
This is where you can download the Sims Link which can automatically transfer data from Sims into the Parents’ Evening Booking System. This link will only work if your school’s SIMS server is locally hosted and we install it during the training process.
You can also download Report Definition files which can be imported into SIMS manually and allow you to export reports in a CSV format for manual import into the Parents’ Evening system.
We recommend contacting our support team to assist you in downloading and installing the link and importing Report Definition Files into SIMS.
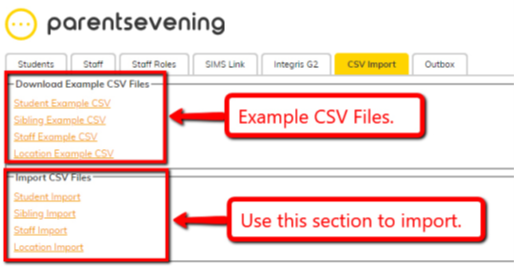
CSV Import
If you do not have an automatic link to your school’s MIS, your data can be imported manually into the Parents’ Evening system using CSV documents.
Please do not use these manual imports if you are in any way unsure about how they work as they may overwrite any school data currently in the Parents’ Evening system if used incorrectly.
Examples – In order to import data from a CSV file, your school information needs to be in a specific format. By clicking the relevant Example CSV files from the options shown, you can download a CSV outline which will show the data required. With certain management systems, you can automatically export the required CSV file already filled in to save you having to type the information manually.
Manual Importing – If you have your required data saved in a CSV file you can import this data into the Parents’ Evening system using the appropriate import screen from the list.
We recommend contacting our support team to assist you if you are unsure about using any of these imports.
Student Import – To Import Student Data (including parent data) click into ‘Student Import’ and then click on ‘Choose file’ to browse for the CSV file on your computer which contains the student information.

When the CSV file is opened it will bring the data across to the import window ready for validation. The data will appear in the top left section of the screen.

The import screen will match up the columns in your CSV file with the required columns for the Parents’ Evening system. You can then click ‘Validate’ in the bottom right corner of the screen to begin the data validation process.
Once the validation is complete any notifications will appear in the ‘Validation Results’ section in the bottom left of the screen.
Results shown in yellow are warnings for any data which was corrected or will be skipped. This does not affect the data in your management information system.
Results shown in red are warnings that data is missing or incorrect, and either a student will not be imported or a change needs paying attention.
The bottom right of the screen will show an ‘Import Summary’. Here you can see figures for how many students will be created and updated and see if these match the number of students you have on-roll.
It will also confirm the number of students marked as off-roll.
Please note: as a safety measure to prevent incorrect data being imported, the filename of the CSV file must include the school name. The system will tell you what this must be.

If too much of your data has changed between imports you will receive an alert which will explain the issue and prevent you from importing the data. If you are sure your data is accurate feel free to call us and we can help you bypass this alert to continue the import. This is a safety measure to stop incorrect data being imported and overwriting the current data in the system.
You will also be notified if students have been removed from your management system or have been marked off-roll since your last import. To confirm this change, click ‘Yes’ in the ‘Confirm’ pop up and they will be removed from the Parents’ Evening system.
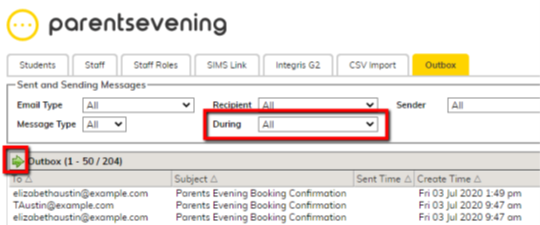
Outbox
The outbox is used to show you any text messages or emails that have been sent through the Parents’ Evening system.
Filters – You will need to use the filters across the top to show any messages. The most used filter is ‘During’ which is set to ‘Today’ by default but can be changed to show any messages sent during specific time periods or every message ever sent.
The other filters allow you to sort by whether the message was a text or an email, who it was sent to, who it was sent by and if it was sent successfully.
Back/Forward – You will only be able to see 50 messages per page so you can use the green arrows to see the next page or return to a previous one.
Status/Refresh – This column informs you if the message has been sent, is in transit or if it has failed. By clicking ‘Refresh’ in the bottom right, you can update the message list as they are being sent.
View Message – You can view the contents of the messages that have been sent by selecting a message and clicking ‘View Message’ in the bottom right, or just double-clicking the message.